
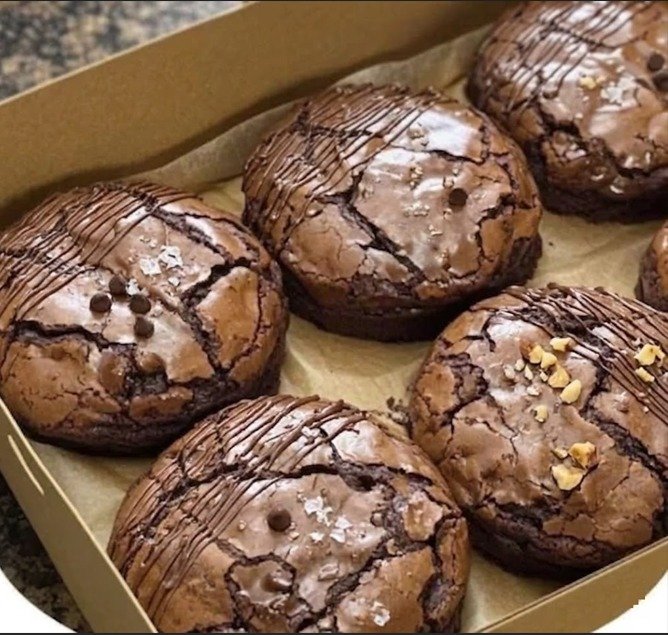
Let’s be real—nobody’s trying to eat dry, sad brownies that taste like chocolate-flavored cardboard.
We’re not doing that here.
These are heavy-hitter, ultra-dense, melt-in-your-mouth fudgy brownies with a glossy crackly top that basically shines back at you. Toss in sourdough discard? Now you’ve got depth, a tiny tang, and a flavor profile that actually shows up and shows out.
This is your comeback brownie. No fluff. No cakey energy. Just straight-up fudgy chaos.
🍫 What Makes These So Ridiculously Fudgy
This isn’t luck—it’s control.
- More fat than flour = that dense, almost truffle-like bite
- Melted chocolate + cocoa powder = deep, layered chocolate punch
- Barely any mixing = keeps it from turning into cake (we don’t want that life)
- Slight underbake = gooey center that firms up as it cools
And honestly? They hit even harder the next day. If you can wait that long.
🧾 Ingredient Lineup (9–12 Squares)
🍫 Chocolate Base:
- 170g dark chocolate (60–70%), chopped
- 115g butter
This is your “rich and unapologetic” foundation.
🍯 Sweet + Structure:
- 1 cup white sugar
- ½ cup brown sugar
White sugar = shiny top energy
Brown sugar = soft, chewy backbone
🥚 Eggs:
- 2 eggs
- 1 extra yolk
That yolk? That’s the secret weapon for next-level fudginess.
🌑 Dry Mix:
- ½ cup flour
- ¼ cup cocoa powder
Structure meets intensity. That’s the balance.
✨ Flavor Boost:
- 1 tsp vanilla
- 1 tsp salt
- ½ cup sourdough discard
Salt isn’t optional—it makes the chocolate hit harder.
👩🍳 How to Lock These In
1. Get Set First
Preheat oven to 350°F (175°C).
Line your pan with parchment paper (leave overhang so you can lift it out like a pro later).
No shortcuts here—future you will thank you.
2. Melt the Good Stuff
Slow-melt chocolate + butter (double boiler or short microwave bursts).
You want smooth, glossy, silky—not scorched.
Let it chill for a few minutes so it doesn’t scramble your eggs.
3. Sugar Drop
Stir in both sugars while it’s still warm.
It’ll look grainy and thick—that’s exactly what you want.
This step = your crackly top insurance policy.
4. Eggs = Shine Mode
Add eggs one at a time, mixing well.
Then toss in the extra yolk, vanilla, salt, and sourdough discard.
Whisk until it turns glossy, thick, and slightly dramatic-looking.
If it shines, you’re winning.
5. Dry Ingredients Go In
Sift in flour + cocoa powder.
Fold gently—no aggressive stirring, no overmixing, no cake behavior allowed.
Batter should be thick, heavy, and glossy.
6. Bake Like You Mean It
Pour into pan, smooth it out, and bake 22–28 minutes.
You’re looking for:
- Crackly top
- Set edges
- Soft, slightly jiggly center
Toothpick test = moist crumbs, not clean, not wet.
7. Let It Chill (Literally)
Let it cool for at least 1 hour.
This is where the magic sets in. The fudgy center firms up and everything locks together.
Cut early and it’ll be messy—but still dangerously good.
Slice with a sharp knife and act like you planned it.
🔥 Pro-Level Moves
- Don’t overbake (this is the #1 brownie crime)
- Use real dark chocolate, not cheap stuff
- Fold gently once flour goes in
- Let them fully cool before slicing (seriously)
💡 Flavor Glow-Ups
- Chocolate chunks = molten pockets everywhere
- Chopped nuts = crunch contrast
- Flaky salt on top = sweet-salty flex
- Peanut butter swirl = next-level upgrade
- Caramel ribbon = straight-up dangerous
🧊 Storage Vibes
- Room temp: 3–4 days (covered)
- Fridge: up to 1 week (firmer, extra chewy)
- Freezer: up to 2 months (future-you snack stash)
❤️ Final Word
These sourdough fudgy brownies aren’t trying to be “light” or “cakey” or anything polite.
They’re dense. They’re rich. They’re loud in flavor.
That crackly top, that soft center, that deep chocolate hit?
Yeah… this batch disappears fast.